

Capturing an image correctly in camera is far better than hours of correction in Photoshop later, but that doesn't mean editing isn't important! A photographers editing style is just as important as their photographic style and gear they used, it makes every photographer unique.
My style of photography can be described as warm and full of emotion with a lovely soft, out of focus background making the subject stand out. I prefer to photograph late in the afternoon or very early morning during the "golden hours" when the sunlight is shining through trees and bushes. I absolutely love warm images which is way 9 times out of 10 I add additional warmth to an image, and why I choose to use editing techniques and Photoshop actions that bring more warmth to an image.
When I was contacted by Sleek Lens last week asking if I wanted to try out their editing workflow and after a quick look at their website I couldn't say no! The great thing about their workflow is it comes in both a set of Photoshop actions or Lightroom presets. I start my workflow in Lightroom to cull photo session images and apply very basic edits (mainly for the synchronising feature which saves a tonne of time) and then finish each image off in Photoshop, which is why I opted for the Photoshop action sets.
So naturally I persuaded Archie to once again be a model for the afternoon so I could capture a few images and edit them with the brand new Sleek Lens actions. I absolutely loved going through and experimenting with all the actions.
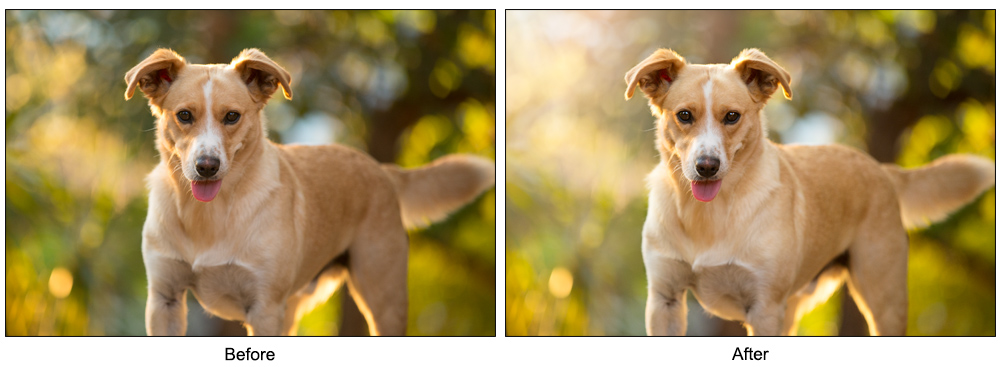
I always start editing an image by adjusting sharpness, contact, shadows, highlights, clarity and saturation in either Camera Raw or Lightroom (since both software save edits as XMP files I can always revisit and edit the original sliders). I then opened the image in Photoshop and tried a few of the new actions until I came across a few of them that suited this image. I firstly began with the Honey Skin Brush action as this brightened Archie's caramel coat colour (by using a mask I only let this action show through on his coat and not the background), followed by Reduced Reds as the tree trunks in the background were too red for my liking. I then used the Girl Like You action to enhance the tones, brightened the image overall and give it a little contract kick. Lastly I added both the Soft Warm and Blue Fire light glow actions as I felt the image could benefit with a slight sun flare in the top corner. It is standard for me to always end editing an image by sharpening the eyes and lightening the existing catchlight to make eyes sparkle. A lovely set of actions which really elevates an image!

As before I started with the basic adjustments I always do in Camera Raw. I then opened the image in Photoshop and removed the leash and rubbish in the grass and added catchlight in Archie's eyes. Then the real magic begins! I started with the Honey Skin Brush action to give Archie's coat that lovely golden glow and used the Girl Like You action again to give the image that little kick of contrast. The afternoon sunlight was shining through the trees behind Archie but I felt a nice warm lens flare would enhance the image so I added the Soft Warm action. Last but not least I decided to give this image a vignette so I used the Dark Vignette on a very low opacity which is found in the Toned Vignette action.

I got that "Allira can we go home now" look from Archie so I snapped one more frame. Again the basic edits were done in Camera Raw then opened in Photoshop. I know I keep repeating the same or similar actions but this comes back to my style of image and my editing style, I just love warm images with flare! I started by warming the image with the Warmer action then moved onto Honey Skin Brush and by using a mash only applied that action to Archie's coat. Hot Kiss action was next with Summer Love masked to effect Archie's coat again (for some reason his coat colour gets lost in photos!). Lastly Reduce Reds helped tone down the red in the tree trunks in the background (after all that warmth in the image they need to be toned down) and the all important Neutral Light Glow masking out Archie's face so he wasn't lost in the flare.
One thing to remember when purchasing and using actions/presets is that
every image is different and an action that looks good on one image may
not suit another. It is always worth while sitting down and
playing with each action so you become familiar with each one and in
time you will know within seconds which action to use on what image. It
is also good to learn how to create your own actions which can cut down
on editing time when doing the same editing steps over and over again.
For example I have an action for saving images for web, preparing an
image for printing and one which puts my copyright details on an image
with one click.
Thank you so much to Sleek Lens for sending me over the fabulous Photoshop actions (remember they come in Lightroom presets too!), I will defintiely be using them in my workflow from now on!
Also, if you are a busy person and don't have time for editing Sleek Lens have a professional photo editing service which can be viewed by clicking here.


Leave A Comment
Comments